Automating uptime monitoring on Kubernetes with Pingdom
We delve into Pingdom, a powerful uptime checker for monitoring the availability and performance of web applications and services. Discover the benefits of Pingdom's managed, commercial single platform solution and take a look at how it works with Kubernetes
This is the second part of this current series of blogs. The previous article discusses automating monitoring for Statuscake. In this article, we will be looking at another Uptime checker that can be used for monitoring liveness of our services, Pingdom.
Pingdom is a managed, commercial single platform solution for monitoring the availability and performance of web applications and services. With over 60+ probe servers worldwide, we can be confident that we will always get a true state of services being monitored. They are used in Data Science Projects.
Pingdom features
Below are features that Pingdom provides:
Uptime Monitoring: Pingdom provides real-time monitoring for site availability from over 70 locations worldwide.
Instant Alerts: Get instant notification via SMS, Slack or Email whenever the website goes down.
Page Speed Monitoring: Examine and optimize the load time of the website using Page speed reports.
Visitor Insights: Find out whether visitors are happy or frustrated with the website’s performance, and how it performs from a specific country or web browser.
Transaction Monitoring Tools: Automated website interaction simulation to evaluate validity and performance of site flows.
Our key focus on using Pingdom for Kubernetes microservices monitoring is to get immediate alerts when an incident happen, and with relevant information needed to resolve an issue as quickly as possible. Service liveness monitoring is most commonly done through the HTTP protocol.
As you roll out production services leveraging Infrastructure based in containers and Kubernetes Orchestration engine, you’ll need a monitoring solution such as Pingdom for all services being deployed. Registering multiple services, and updating or deleting each which may need to be modified can be a pain when dealing with many multiples of services. The work of Ingress Monitor Controller (IMC) is to watch your Kubernetes Services/Ingresses and automatically create/update or delete monitors on Pingdom. So in this context we can think of Ingress Monitor Controller (IMC) is an “automated monitoring agent” for Pingdom. Once the state of the service is recorded on Pingdom, an alert can be triggered depending on the state value.
This helps to bridge the gap between real-time monitoring of Kubernetes services and manual addition/removal of uptime monitors on Pingdom.
For a deeper understanding of monitoring practices on Kubernetes, you may find our blog post on Monitoring on Kubernetes enlightening. This post discusses various monitoring strategies and tools suitable for Kubernetes environments, providing valuable insights into optimizing your monitoring practices.
Pingdom Account set up
If you’re new to Pingdom and would like to create a test account, there is a 14 day trial. You can quickly sign up on https://www.pingdom.com/signup/ for the Pingdom Starter package.
Once the sign up process is completed, Login to Pingdom Management dashboard to obtain your API credentials on https://my.pingdom.com/account/appkeys. This is same as navigating to Integrations > The Pingdom API > Register Application. You’ll be asked to provide application name and Description. See below screenshot for visualization.
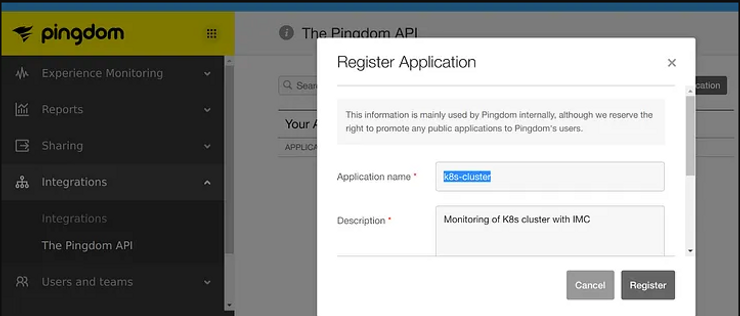
When done, click “Register” button at the bottom to generate API credentials to be used on IMC setup. New Application Key should be generated with name provided. This will be your apiKey on IMC.
Services on Kubernetes
Let’s take a look at an example setup on Kubernetes with which we can use Pingdom for creating monitors and alerts for our service. We will start by creating a simple service deployment to be used in our test in the test namespace.
Create a test namespace using the command below:
$ kubectl create namespace test-namespace
namespace/test-namespace created
We will then deploy a test web application based on katacoda golang-http-server to the namespace added above.
Step 1: Start by creating a directory for deployments:
$ mkdir k8s-test
$ cd k8s-test
Step 2: Create a deployment configuration object:
$ vim deployment.yml
apiVersion: extensions/v1beta1
kind: Deployment
metadata:
  name: http-app
spec:
  replicas: 2
  template:
    metadata:
      labels:
        app: http-app
    spec:
      containers:
      - name: http-app
        image: katacoda/docker-http-server:latest
        ports:
        - containerPort: 80
To deploy, run the command:
$ kubectl apply -f deployment.yml
deployment.extensions/http-app created
Two pods should be created from the above command:
$ kubectl -ntest-namespace get pod | grep http-app
http-app-97f76fcd8-mzv49       1/1       Running   0          3m
http-app-97f76fcd8-xkhj7       1/1       Running   0          3m
When done with the deployment, then create a service:
$ cat http-app-service.yml
apiVersion: v1
kind: Service
metadata:
 name: http-app-svc
 labels:
 app: http-app
spec:
 type: NodePort
 ports:
 — port: 80
 nodePort: 30080
 selector:
 app: http-app
Deploy it to Kubernetes by running below command:
$ kubectl -n test-namespace apply -f http-app-service.yml
service/http-app-svc created
$ kubectl -n test-namespace get service | grep http-app-svc
http-app-svc NodePort 10.98.53.188 <none> 80:30080/TCP 28s
Test service functionality using curl:
$ curl 10.98.53.188
<h1>This request was processed by host: http-app-97f76fcd8-xkhj7</h1>
$ curl 10.98.53.188
<h1>This request was processed by host: http-app-97f76fcd8-mzv49</h1>
You can confirm that we’re getting response from our two pods created earlier.
Step 3: Creating an Ingress resource
For a service on Kubernetes to be exposed to the external world, you need to deploy an Ingress. Ingress is a collection of rules and routing policies that govern how external users get access to Kubernetes internal services. For this guide, we are using Kubernetes Nginx Ingress. Learn more about deploying and using Ingress on Kubernetes on k8s.io
If you want to learn more about implementing canary releases with Nginx Ingress Controller on Kubernetes, our blog post on setting up Nginx Ingress Controller to implement canary releases walks you through the setup process step by step. This can be particularly useful for those looking to adopt progressive delivery practices in their Kubernetes deployments.
Once you have an Ingress deployed, proceed to create an ingress resource which has a definition of the service that the Ingress will serve from. Below is the resource definition:
$ cat nginx-ingress.yml
apiVersion: extensions/v1beta1
kind: Ingress
metadata:
 namespace: test-namespace
 name: http-app-svc-ingress
 annotations:
   kubernetes.io/ingress.class: "nginx"
   monitor.stakater.com/enabled: "true"
spec:
 rules:
 — host: service.example.com
 http:
 paths:
 — path: /
 backend:
 serviceName: http-app-svc
 servicePort: 80
Replace service.example.com with your valid service domain/subdomain record.
You can then deploy it to Kubernetes cluster using the kubectl apply command:
$ kubectl apply -f ingress.yml
This ingress is linked to our service (http-app-svc) created earlier as the backend. Make sure you have monitor.stakater.com/enabled: “true” annotation for IMC to monitor it.
$ kubectl -n test-namespace get ingresses.extensions
NAME HOSTS ADDRESS PORTS AGE
*.svc-ingress test.example.com 192.168.10.5 80 10s
When Ingress is running, you can proceed to deploy IMC.
How to Deploy Ingress Monitor Controller
IMC watches Ingresses in the cluster for registering on Pingdom. IMC can monitor ingresses on all or specific namespaces. To deploy IMC in the cluster, we can follow these simple steps:
First download the manifest file from the repository
$ wget https://raw.githubusercontent.com/stakater/IngressMonitorController/master/deployments/kubernetes/ingressmonitorcontroller.yaml
Edit the ingressmonitorcontroller.yaml file to specify correct namespace
$ grep namespace ingressmonitorcontroller.yaml
namespace: test-namespace
Next we need to edit configmap.yaml data of the ConfigMap resource to specify configuration parameters for Pingdom under the data section.
Populate the data section with your Pingdom API credentials:
data:
 config.yaml: |-
   providers:
   — name: Pingdom
   apiKey: pingdom-api-key
   apiURL: https://api.pingdom.com/
   username: email-address
   Password: pingdom-account-password
   enableMonitorDeletion: true
   monitorNameTemplate: "{{.Namespace}}-{{.IngressName}}"
Once you have made the changes, apply them to Kubernetes cluster by running:
$ kubectl apply -f ingressmonitorcontroller.yaml -n test-namespace
serviceaccount/ingressmonitorcontroller created
configmap/ingressmonitorcontroller configured
deployment.extensions/ingressmonitorcontroller created
clusterrole.rbac.authorization.k8s.io/ingressmonitorcontroller-role created
clusterrolebinding.rbac.authorization.k8s.io/ingressmonitorcontroller-role-binding created
Lastly ensure Deployment object is running as well.
$ kubectl -n test-namespace get pods | grep ingressmonitorcontroller
ingressmonitorcontroller-84dccb865c-gdpvd 1/1 Running 0 10d
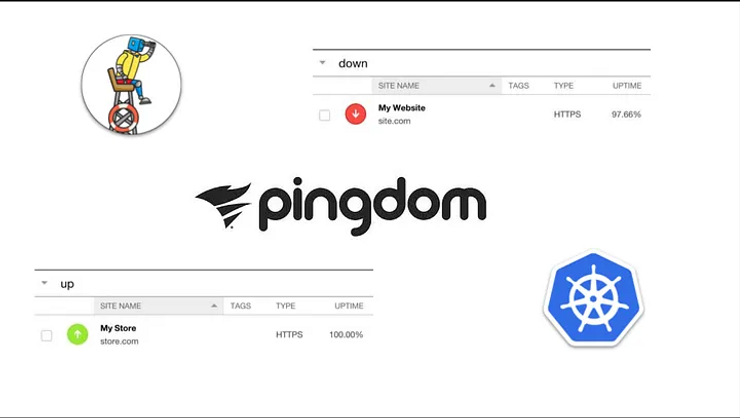
Once the Ingress Monitor Controller is in running state, login to Pingdom Dashboard and confirm if uptime test for the ingress was created.

Under Reports > Uptime, you can also see uptime reports, when did the server go down, etc.

Here is also a quick demonstrating of how Ingress Monitor Controller registers monitors on Pingdom for new Ingresses:
Conclusion
Pingdom offers some rich features for website monitoring, including liveness checking and alerting. And when multiple services need to be monitored on Kubernetes, Ingress Monitor Controller (IMC) can be used for easily automating monitors to Pingdom. When an ingress is created or deleted, you don’t need to manually add or remove the monitor on Pingdom, IMC does the job for you automatically.
However, it’s crucial to not only monitor the availability and performance of your services but also to ensure the security of your Kubernetes infrastructure. For a comprehensive approach to Kubernetes security, consider implementing measures to secure your Kubernetes Infrastructure. This will help you safeguard your Kubernetes clusters against potential threats, ensuring the reliability and integrity of your services.